Introduction
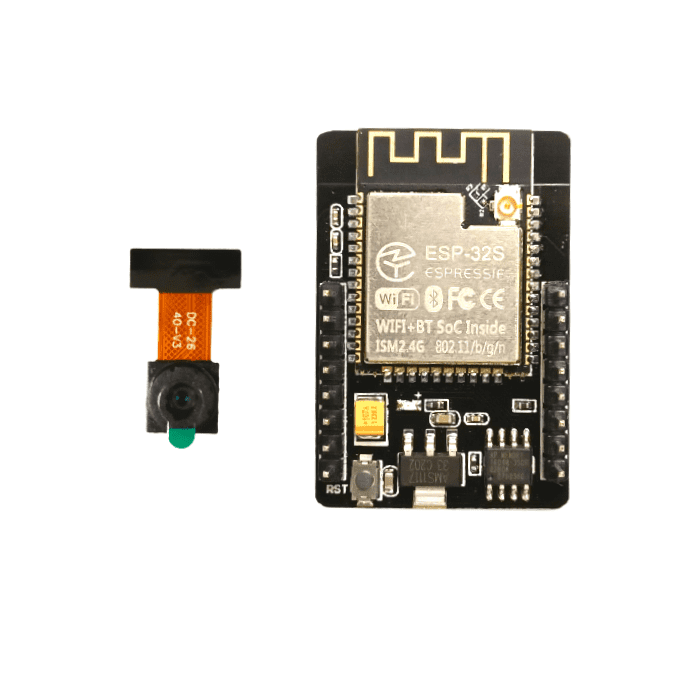
The ESP32-CAM is a low-cost ESP32 development board with an onboard camera. This is an ideal solution for IoT applications, prototype constructions, and DIY projects. Wi-Fi and low-power BLE are integrated on the board, as well as two high-performance 32-bit LX6 CPUs.
In addition to AI (artificial intelligence) applications, the ESP32-CAM board can also be used for other kinds of robotics applications. It is capable of low latency video streaming to smartphones and PCs while maintaining a relatively low power consumption as well.


Components on the Board
Features
- It has onboard, Wi-Fi and Bluetooth.
- Supports OV2640 and OV7670 cameras.
- This ESP32-CAM OV2640 camera with the Flash.
- Extremely low power consumption.
- Dual-core 32-bit CPU for application processors.
- It is a small size, and easy to integrate a camera module.
- on Board MicroSD card slot.
- This integrated camera has an adjustable pixel (from low to high).
Specification:
- WIFI module: ESP-32S
- Processor: ESP32-D0WD
- Built-in Flash: 32Mbit
- Antenna: Onboard PCB antenna
- Wi-Fi protocol: IEEE 802.11 b/g/n/e/i
- Bluetooth: Bluetooth 4.2 BR/EDR and BLE
- Security: WPA/WPA2/WPA2-Enterprise/WPS
- Supported TF card: up to 4G
- Peripheral interface: UART/SPI/I2C/PWM
- IO port: 9
- UART baud rate: default 115200bps
- Power supply: 5V
- Transmitting power:
- 802.11b: 17 ±2dBm(@11Mbps)
- 802.11g: 14 ±2dBm(@54Mbps)
- 802.11n: 13 ±2dBm(@HT20, MCS7)
- Receiving sensitivity:
- CCK,1Mbps: -90 dBm
- CCK,11Mbps: -85 dBm
- 6Mbps (1/2 BPSK): -88 dBm
- 54Mbps (3/4 64-QAM): -70 dBm
- HT20, MCS7(65Mbps, 72.2Mbps): -67 dBm
- Power consumption:
- Flash off: 180mA@5V
- Flash on and brightness max: 310mA@5V
- Deep-Sleep: as low as 6mA@5V
- Modern-Sleep: as low as 20mA@5V
- Light-Sleep: as low as 6.7mA@5V
- Dimensions: 40.5mm x 27mm x 4.5mm
ESP32 - Pinout:
The board has three GND pins and two power pins: 3.3V or 5V.
Serial pins are GPIO 1 and GPIO 3. These pins are required for uploading code to the board. Additionally, GPIO 0 plays a significant role since it determines whether the ESP32 is in flash mode. The ESP32 is set to flashing mode when GPIO 0 is connected to GND.

There is one major difference between using the ESP32-CAM and regular ESP32 modules. Due to its lack of a USB port, the ESP32-CAM cannot simply be plugged into your computer and loaded with programs. FTDI adapters must be used externally to program the ESP-32 CAM module.

|
ESP32-CAM |
Programmer |
|
GND |
RGND |
|
Rx |
Rx |
|
Tx |
Tx |
|
5V |
5V |
|
GND and GPIO 0 |
ESP32 into flash mode |

Before uploading to the board, Board has a small 24-pin connector at the end. Please ensure that the CAM - 24 connectors are correctly placed on the ESP32 board.
Working / Implementation:
ESP32 CAM Wi-Fi Module Bluetooth with OV2640 Camera Module 2MP for Face Recognition has an extremely competitive small camera module that can be operated independently as a minimal system with a footprint of only 40 x 27mm. It provides a deep sleep current of up to 6mA and is widely used in various IoT applications.
Suitable for smart home devices, industrial wireless control, wireless monitoring and other his IoT applications.
Adopting a DIP package, the module can be directly inserted into the backplane to achieve rapid product production and provide customers with a reliable connection mode suitable for applications in various IoT hardware terminals.
ESP integrates Wi-Fi, traditional Bluetooth, and BLE beacons with two powerful 32-bit LX6 CPUs and 7-stage pipeline architecture. It has a main frequency adjustment range of 80MHz to 240MHz, on-chip sensors, Hall sensors, temperature sensors, and more.
As we are powering the ESP32-CAM using the 5-volt power pin, the FTDI adapter must be set to a 5-volt VCC output.
5V setup is recommended as it increases the range without the end of an external antenna. While programming the ESP32-CAM, you'll need to note that GPIO 0 is connected to Ground.
Installation
Get started with Arduino IDE:
Step 1: Install Arduino IDE
Step 2: Change the preference to ESP32

Step 3:Install ESP32 Board to your IDE. go to tool >> Board >> Board Manager >> Install ESP32.

Step 4: To get Code, Goto Files >> Examples >> ESP32 >> Camera >>Webserver. Or copy the below code and past it to your IDE.
Remember: Set the SSID and Password of your available Hotspot.
Code:
#include "esp_camera.h"
#include <WiFi.h>
// ===================
// Select camera model
// ===================
//#define CAMERA_MODEL_AI_THINKER // Has PSRAM
//#define CAMERA_MODEL_TTGO_T_JOURNAL // No PSRAM
// ** Espressif Internal Boards **
#Define CAMERA_MODEL_ESP32_CAM_BOARD
//#define CAMERA_MODEL_ESP32S2_CAM_BOARD
//#define CAMERA_MODEL_ESP32S3_CAM_LCD
#include "camera_pins.h"
// ===========================
// Enter your WiFi credentials
// ===========================
const char* ssid = "**********";
const char* password = "**********";
void startCameraServer();
void setup () {
Serial.begin(115200);
Serial.setDebugOutput(true);
Serial.println();
camera_config_t config;
config.ledc_channel = LEDC_CHANNEL_0;
config.ledc_timer = LEDC_TIMER_0;
config.pin_d0 = Y2_GPIO_NUM;
config.pin_d1 = Y3_GPIO_NUM;
config.pin_d2 = Y4_GPIO_NUM;
config.pin_d3 = Y5_GPIO_NUM;
config.pin_d4 = Y6_GPIO_NUM;
config.pin_d5 = Y7_GPIO_NUM;
config.pin_d6 = Y8_GPIO_NUM;
config.pin_d7 = Y9_GPIO_NUM;
config.pin_xclk = XCLK_GPIO_NUM;
config.pin_pclk = PCLK_GPIO_NUM;
config.pin_vsync = VSYNC_GPIO_NUM;
config.pin_href = HREF_GPIO_NUM;
config.pin_sscb_sda = SIOD_GPIO_NUM;
config.pin_sscb_scl = SIOC_GPIO_NUM;
config.pin_pwdn = PWDN_GPIO_NUM;
config.pin_reset = RESET_GPIO_NUM;
config.xclk_freq_hz = 20000000;
config.frame_size = FRAMESIZE_UXGA;
config.pixel_format = PIXFORMAT_JPEG; // for streaming
//config.pixel_format = PIXFORMAT_RGB565; // for face detection/recognition
config.grab_mode = CAMERA_GRAB_WHEN_EMPTY;
config.fb_location = CAMERA_FB_IN_PSRAM;
config.jpeg_quality = 12;
config.fb_count = 1;
if(config.pixel_format == PIXFORMAT_JPEG) {
if(prefund ()){
config.jpeg_quality = 10;
config.fb_count = 2;
config.grab_mode = CAMERA_GRAB_LATEST;
} else {
config.frame_size = FRAMESIZE_SVGA;
config.fb_location = CAMERA_FB_IN_DRAM;
}
} else {
// Best option for face detection/recognition
config.frame_size = FRAMESIZE_240X240;
#If CONFIG_IDF_TARGET_ESP32S3
config.fb_count = 2;
#endif
}
#if defined(CAMERA_MODEL_ESP_EYE)
pinMode(13, INPUT_PULLUP);
pinMode(14, INPUT_PULLUP);
#endif
// camera init
esp_err_t err = esp_camera_init(&config);
if (err != ESP_OK) {
Serial.println("Initiation of the camera failed because of an error, - 0x%x", err);
return;
}
sensor_t * s = esp_camera_sensor_get();
if (s->id.PID == OV3660_PID) {
s->set_vflip(s, 1); // flip it back
s->set_brightness(s, 1);
s->set_saturation(s, -2); // lower the saturation
}
if(config.pixel_format == PIXFORMAT_JPEG){
s->set_framesize(s, FRAMESIZE_QVGA);
}
#if defined(CAMERA_MODEL_M5STACK_WIDE) || defined(CAMERA_MODEL_M5STACK_ESP32CAM)
s->set_vflip(s, 1);
s->set_hmirror(s, 1);
#endif
#if defined(CAMERA_MODEL_ESP32S3_EYE)
s->set_vflip(s, 1);
#endif
WiFi.begin(ssid, password);
WiFi.setSleep(false);
while (WiFi.status() != WL_CONNECTED) {
delay(500);
Serial.print(".");
}
Serial.println("");
Serial.println("WiFi connected");
startCameraServer();
Serial.print("Camera Ready! Use 'http://");
Serial.print(WiFi.localIP());
Serial.println("' to connect");
}
void loop() {
delay(10000);
}
Applications
- Smart home devices
- Wireless monitoring
- Intelligence QR Scanner
- AI - Facial recognition
- Smart city
- Use as a personal CCTV and webcam
- Live streaming
Conclusion
In this blog post, we have learnt that the ESP32 CAM is a versatile and powerful module that offers a wide range of features and specifications for your projects. Its seamless integration with popular programming languages and frameworks makes it a developer's dream. Whether you're a DIY enthusiast or a professional, this tiny but mighty module will not disappoint. With its ability to capture high-quality images and stream videos, the ESP32 CAM finds its applications in security systems, remote monitoring, IoT projects, and much more. So, don't wait any longer, get your hands on this incredible ESP32 CAM module, and unleash your creativity today!
If you appreciate our work don't forget to share this post and leave your opinion in the comment box.
Please do check out other blog posts about Popular electronics
Make sure you check out our wide range of products and collections (we offer some exciting deals!)