Introduction:
Starting a fun journey into robots, our blog looks at robots that do not bump into objects. These robots can move on their own and have special sensors connected to a computer called Arduino. These robots have lots of uses, like changing how things are made and adding cool stuff to our everyday routines. We take a close look and figure out how they work, how the sensors and the computer work together. As we keep going on this trip, we see things change – from metal and smart thinking to robots that know stuff, make choices, and help make things better. Entering a world with no set rules, these robots become big inspirations for people who really like robot mysteries. They make people want to learn more and more, like a fire that keeps on burning, making them want to know everything about this tech world where things are mixed up, and what's usual becomes a big puzzle. Like a nice dance, they work together, like friends playing in space. It's a special time when lots of new ideas come out, like water splashing and touching the world, showing what can be done, moving towards a time when machines work really well, like fancy dancers, showing how people can make cool stuff and be brave, making new things that push progress forward.
With clear cut explanation and simple code, this project helps people understand the technology and programming. As lines of code bring robots to life, new ideas start to shine, showing that progress is like a mix of thinking and technology. This project is a big key for new exciting ideas, a path for learning, and a walk into what robots can do.
Project Description:
In the world of new ideas, when the smartness of Arduino and the understanding of ultrasonic sensors come together, something amazing is born. It is like a perfect dance in space, where complicated things mix and create a puzzle. At the centre, there is a special robot that moves on its own, like a dancer on a tricky stage, copying the moves of something magical. Watch carefully as the special code, like a digital song, guide this robot through life's journey, while careful ultrasonic eyes measure the way, showing the path in the maze of life. Our smart dance here starts when the robot notices something close, like less than 15cm away. It stops and thinks, and then goes on if nothing is too close. In this exciting journey, the hard stuff becomes easy to understand. Each line of instructions brings a new idea to life. In this big play of making things, change isn't just seen; it's part of the dance, where dreams and real things come together, where thinking mixes with Arduino technology.
read more : Exploring LCD Displays and Arduino UNO
Components Required:
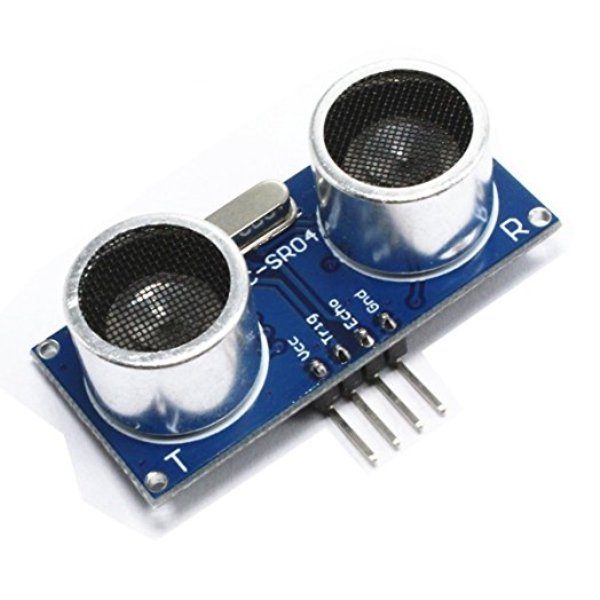
- Arduino UNO
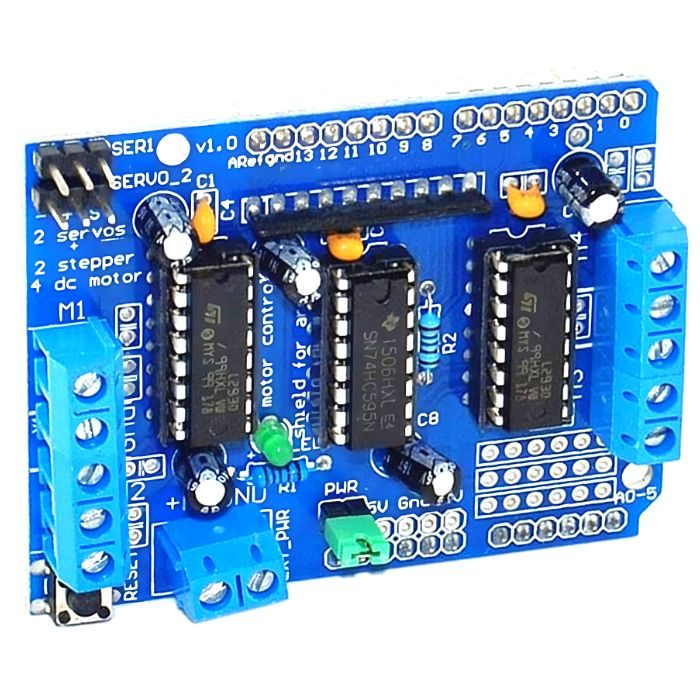
- L293D Motor Driver Shield
- Pair of BO Motors
- Ultrasonic Sensor
- Power Supply or Battery (9V preferably)
- Jumper Wires
Connections:
- Attach the VCC (power) pin of the ultrasonic sensor to the +5V pin on the Arduino board.
- Attach the GND (ground) pin of the ultrasonic sensor to the GND pin on the Arduino board.
- For the ultrasonic sensor's Echo and Trigger pins, link them to digital pins A0 and A1 respectively on the Arduino.
- Connect the motor to the ports M3. (You will need to connect both the terminal of the motor to the output).
- Connect the motor to the ports M4 similarly.
- Supply power to the L298D Motor Driver by connecting the battery to its power input.
- Finally, establish a connection between the Arduino UNO and your computer using a USB cable.
Circuit Diagram:

read more : Arduino Uno Pin Diagram: A Complete Guide
Libraries to be Downloaded:
Make sure you also have the NewPing and AFMotor libraries installed in your Arduino IDE for this code to work properly.
Code:
#include

#include

AF_DCMotor motor3(3, MOTOR34_1KHZ);

AF_DCMotor motor4(4, MOTOR34_1KHZ);

#define TRIGGER_PIN A1

#define ECHO_PIN A0

#define MAX_DISTANCE 200 // Maximum distance in cm.

NewPing sonar(TRIGGER_PIN, ECHO_PIN, MAX_DISTANCE);

void setup()

{

Serial.begin(9600);

motor3.setSpeed(180);

motor4.setSpeed(180);

}

void loop()

{

unsigned int distance = sonar.ping_cm();

Serial.println(distance);

if (distance >= 15) {

// Move forward if distance is greater than or equal to 15cm

motor3.run(FORWARD);

motor4.run(FORWARD);

}

else

{

// Stop briefly, then continue moving forward

motor3.run(FORWARD);

motor4.run(RELEASE);

delay(500);

motor3.run(FORWARD);

motor4.run(FORWARD);

}

delay(100); // Delay between readings

}
Code explanation:
The AF_DCMotor lines initialize two DC motors, motor3 and motor4, which are connected to pins 3 and 4 respectively on the motor driver.
TRIGGER_PIN and ECHO_PIN define the pins connected to the ultrasonic sensor's trigger and echo pins, respectively. These pins are connected to A1 and A0 on the Arduino.
MAX_DISTANCE is set to 200, which represents the maximum distance the ultrasonic sensor can accurately measure in cm.
The NewPing object 'sonar' is created with the trigger, echo, and maximum distance information.
In the setup () function, the serial communication is initiated at a baud rate of 9600.
The setSpeed(180) lines set the speed of the motors to 180.
Inside the loop () function, the ultrasonic sensor's ping_cm () method is used to measure the distance to an object in front of the robot and the distance is printed on serial monitor.
If the distance is greater than or equal to 15 cm, the motors are set to move forward.
If the distance is less than 15 cm, the motors briefly stop, then continue moving forward after a delay.
A delay of 100 milliseconds is added between readings to avoid excessive readings in a short time.
Result:
Look at the exciting part of this project – a robot that's ready to go and can handle obstacles. It's a clever mix of things, like putting together puzzle pieces. Ultrasonic sensors and computer smarts, like magic spells, make this robot work. Imagine a conductor leading an orchestra – that is how these sensors guide the robot, almost like music. It moves through its world with care, just like a dancer. Watch how it goes: if something is more than 15 cm away, it moves ahead quickly, like a jump. But if it is closer, it takes a quick break, thinking before moving again.
read more : Interfacing ACS712 with Arduino
Conclusion
Our journey through building an Obstacle Avoidance Robot with Ultrasonic Sensors using Arduino has been both illuminating and exciting. We embarked on a captivating exploration of robotics, from the project's inception to its tangible outcome. Through a meticulously laid-out circuit diagram and skillfully crafted code, we witnessed the robot navigate its surroundings with finesse, avoiding obstacles seamlessly. This venture underscores the remarkable synergy between technology and innovation, leaving us eager to delve further into the boundless realm of robotics. Join us in celebrating the triumphs of ingenuity and discovery - a journey that promises endless possibilities!
If you appreciate our work don't forget to share this post and leave your opinion in the comment box.
Please do check out other blog posts about Popular electronics
Make sure you check out our wide range of products and collections (we offer some exciting deals!)