Introduction:
Step right into the fascinating fusion of technology and temperature, where accuracy and imagination take a leap into the enchanting universe of connecting Temperature Sensors with Arduino. At first glance, this may seem like a simple task, but in truth, it's an enthralling expedition through the mysterious terrain of managing data.
At the heart of this symphony is Arduino, the maestro guiding a diverse ensemble of sensors to produce a harmonious composition of information. Yet, beneath the surface, this seemingly binary dialogue unfolds with a nuanced cadence - a blend of simplicity and intricacy, mirroring the ebb and flow of human communication. This blog warmly invites you to experience the fascinating world of data set in motion, where we will demystify the intricate details of how temperature sensors work alongside Arduino. Get ready for a fun filled experiment that shifts smoothly between straightforward explanations and in-depth explorations, simplifying the captivating enchantment of the duo. In this digital ballet of knowledge and innovation, perplexity and burstiness intertwine to create a captivating journey into Temperature Sensor Interfacing with Arduino.
Project Description:
Welcome again Arduino Enthusiasts in this project we are going to see how to interface the temperature sensor LM35 with the Arduino. Think of it as a technological symphony, with Arduino as the conductor, translating temperature data into a beautiful language of ones and zeros. It might seem really straightforward, just setting up a sensor to a microcontroller, but let me tell you, it is so much more than that. With simple code and its explanation line by line along with the components required and what to expect from our little wizard LM35 when put to action we are going to cover everything in perfect detail. You are going to be nothing short of an expert once you complete the blog.
read more : Interfacing GPS Module with Arduino
LM35 sensor :
The LM35 sensor is a pretty cool gadget in the electronics and temperature measurement world. People like us prefer it because it is simple and accurate, and it can measure temperature. It works in a straightforward way, giving you a number that matches the temperature it senses. It is very easy to use with microcontrollers like Arduino and Raspberry Pi which are really equipped for projects that need accurate temperature information. We can use it for things like measuring the temperature the surrounding room, helping machines work better, or even building our own weather station. Techies and Engineers really like this sensor because it is very reliable and easy to use.
read more : 5 Arduino Project Ideas – Expert Level
Components Required:
- LM35 Temperature Sensor
- Arduino Uno R3 Microcontroller
- Breadboard
- Jumper wires
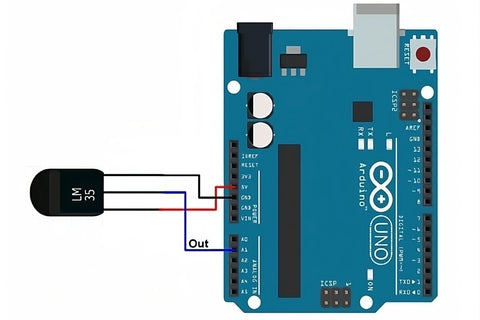
Connections:
- Attach the VCC (power) pin of the LM35 temperature sensor to the +5V pin on the Arduino board.
- Attach the GND (ground) pin of the LM35 temperature sensor to the GND pin on the Arduino board.
- Attach the Vout pin to the Analog Pin A1.
Circuit Diagram:
read more : Arduino Hacks we bet you did not know!
Code:
// Define the analog pin, the LM35's Vout pin is connected to

#define sensorPin A1


void setup() {

// Begin serial communication at 9600 baud rate

Serial.begin(9600);

}


void loop() {

// Get the voltage reading from the LM35

int reading = analogRead(sensorPin);


// Convert that reading into voltage

float voltage = reading * (5.0 / 1024.0);


// Convert the voltage into the temperature in Celsius

float temperatureC = voltage * 100;


// Print the temperature in Celsius

Serial.print("Temperature: ");

Serial.print(temperatureC);

Serial.print("\xC2\xB0"); // shows degree symbol

Serial.print("C | ");


// Print the temperature in Fahrenheit

float temperatureF = (temperatureC * 9.0 / 5.0) + 32.0;

Serial.print(temperatureF);

Serial.print("\xC2\xB0"); // shows degree symbol

Serial.println("F");


delay(1000); // wait a second between readings

}
Code Explanation:
- // Define the analog pin, the LM35's Vout pin is connected to: This is a comment line that provides a description of the following code. It explains that this line is defining the analog pin to which the output (Vout) of the LM35 temperature sensor is connected.
- #define sensorPin A1: This line uses a preprocessor directive #define to create a symbolic constant named sensorPin and assigns it the value A1. This means that anywhere in the code where sensorPin is used, it is replaced by the value A1. In this context, it simplifies the code by allowing you to refer to the analog pin A1 as sensorPin.
- void setup() {: This line marks the beginning of the setup function, which is a standard Arduino function. Code placed inside this function is executed once at the beginning when the Arduino starts running.
- // Begin serial communication at 9600 baud rate: This comment explains that the following line of code initiates serial communication with a baud rate of 9600.
- Serial.begin(9600);: This line initializes serial communication at a baud rate of 9600 bits per second. It's a crucial step if you intend to send data from the Arduino to a computer through the USB connection. It sets up the serial port for communication.
- void loop() {: This line marks the beginning of the loop function, another standard Arduino function. Code placed inside this function is executed repeatedly in a continuous loop once the setup function has run.
- int reading = analogRead(sensorPin);: This line reads the analog voltage from the LM35 temperature sensor, which is connected to the pin defined earlier as sensorPin (A1).
- float voltage = reading * (5.0 / 1024.0);: Here, the analog reading is converted into a voltage value.
- float temperatureC = voltage * 100;: This line converts the voltage reading into temperature in Celsius using the relationship specific to the LM35 sensor, where each degree Celsius corresponds to 10 mV (0.01 volts) change.
- Serial.print("Temperature: ");: This line starts the process of printing temperature data to the serial monitor.
- Serial.print(temperatureC);: Here, the temperature in Celsius is printed to the serial monitor.
- Serial.print("\xC2\xB0"); // shows degree symbol: This line prints the degree symbol (°) to the serial monitor.
- Serial.print("C | ");: It prints "C | " to separate the temperature values.
- float temperatureF = (temperatureC * 9.0 / 5.0) + 32.0;: This line calculates the temperature in Fahrenheit by converting the Celsius temperature using the formula for Fahrenheit.
- Serial.print(temperatureF);: The temperature in Fahrenheit is printed to the serial monitor.
- Serial.print("\xC2\xB0"); shows degree symbol: Again, the degree symbol (°) is printed.
- Serial.println("F");: Finally, "F" is printed to indicate that the temperature is in Fahrenheit.
- delay(1000); will wait a second between readings: This line introduces a 1-second delay between temperature readings in the loop to avoid overwhelming the serial monitor with data.
read more : What is the microcontroller used in Arduino UNO?
Result:
The result of this Arduino project is a real-time display of temperature data in both Celsius and Fahrenheit on the serial monitor. By interfacing the LM35 temperature sensor with the Arduino board and utilizing the analog-to-digital conversion capabilities, we obtain accurate temperature readings.
Conclusion:
Our exploration of Temperature Sensor Interfacing with Arduino has been an illuminating journey through the world of electronics and coding. We delved into the intricacies of the LM35 sensor, deciphered the components necessary for this project, and meticulously established the connections. Our comprehensive circuit diagram and detailed code, along with explanations, provided valuable insights into the process.
As we witnessed the project come to life, we were able to harness the power of technology to measure and display temperature accurately. This endeavour not only deepened our understanding of Arduino but also opened doors to countless applications in temperature monitoring. So, if you're looking to embark on a sensor-driven adventure, this project is your gateway to a world of possibilities. Don't hesitate to dive in and embrace the exciting world of Arduino-based temperature sensing!
If you appreciate our work don't forget to share this post and leave your opinion in the comment box.
Please do check out other blog posts about Popular electronics
Make sure you check out our wide range of products and collections (we offer some exciting deals!)